Introduction
I run my own mail system on a Linux VPS for all incoming and outgoing email. I’m very experienced with email server administration, and it’s fully set up with modern encryption and authentication methods such as TLS, SPF, DKIM, DMARC. It has everything needed for a mail server to have a great reputation to maximise deliverability.
Nevertheless, it’s becoming increasingly difficult to run an email server, or cluster of email servers, in this age when more and more IP ranges are being placed onto private blacklists which aren’t publicly accessible, and which offer no facility for removal of IPs from the blacklists. My VPS’s IP range is apparently on some internal Microsoft blacklist, and my VPS provider is aware of this problem but seems unable to do anything about it. It has therefore become more or less impossible to get email through to Microsoft-hosted email addresses, despite all my best efforts. The logs show that the emails are being accepted, usually by servers whose names end with “mail.protection.outlook.com”, but after being accepted they are apparently being sent directly to the Microsoft Hotmail and Outlook equivalent of /dev/null.
I’ve therefore had to accept that it’s become necessary to relay outgoing email via a service which can ensure the best possible deliverability, and I’m now using Amazon Simple Email Service (SES) for this purpose. However, SES doesn’t offer a simple way of viewing email logs showing the kind of information you see in logs from MTAs such as Postfix, Sendmail, or Exim, so I had to set something up for that. There are various different solutions for this, but I just wanted something quick and easy which would sit nicely alongside my existing mail logs.
This article assumes you already have a Linux mail server set up for your incoming and outgoing email, with the MTA configured so that you’re using procmail on your user account on the server for mail filtering. You’ll also need to have json_xs installed on your server.
This article also assumes you already have SES set up for relaying outgoing email. If you don’t have SES set up, there are plenty of guides out there to help you with that. The process is quite straightforward and mainly involves a few clicks in the SES console then adding some new DNS entries.
Setting up Amazon Simple Notification Service (SNS) notifications for SES
The first part of the process is enabling Amazon SNS as an event destination within the configuration set being used in SES. In the SES console, go to “Configuration sets” under “Configuration” in the navigation bar on the left, select the configuration set being used, then click the “Event destinations” tab. Click the “Add destination” button then you should see something like this:
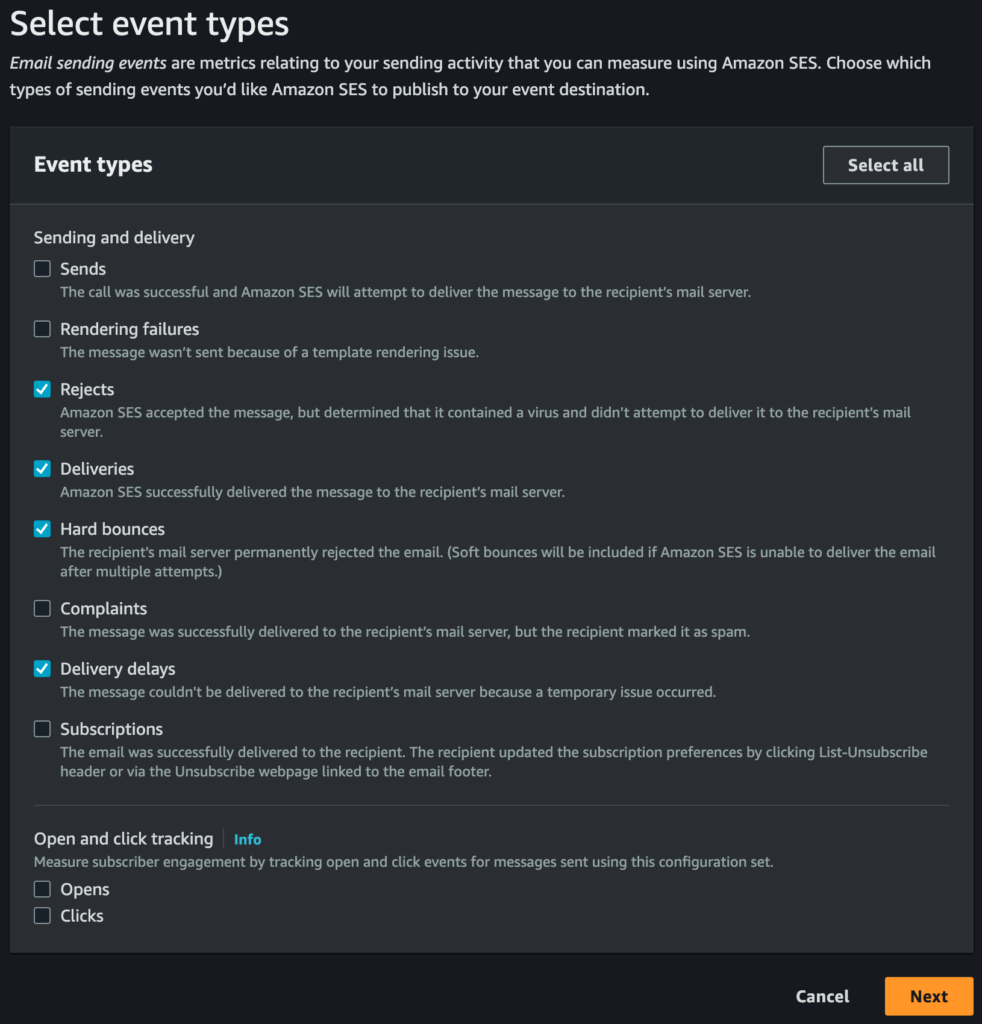
You can choose whatever you like out of the available event types. As I’m not sending marketing emails, I’ve ignored all the events which are only really relevant to those types of emails, such as “Rendering failures”, “Complaints”, “Subscriptions”, etc. I also haven’t selected “Sends”, since this only tells you that SES has accepted your incoming email, and I can already see that information from my MTA logs so don’t need to have it duplicated. I only want to know about “Rejects”, “Deliveries”, “Hard bounces” and “Delivery delays”.
Clicking “Next” brings up this page:
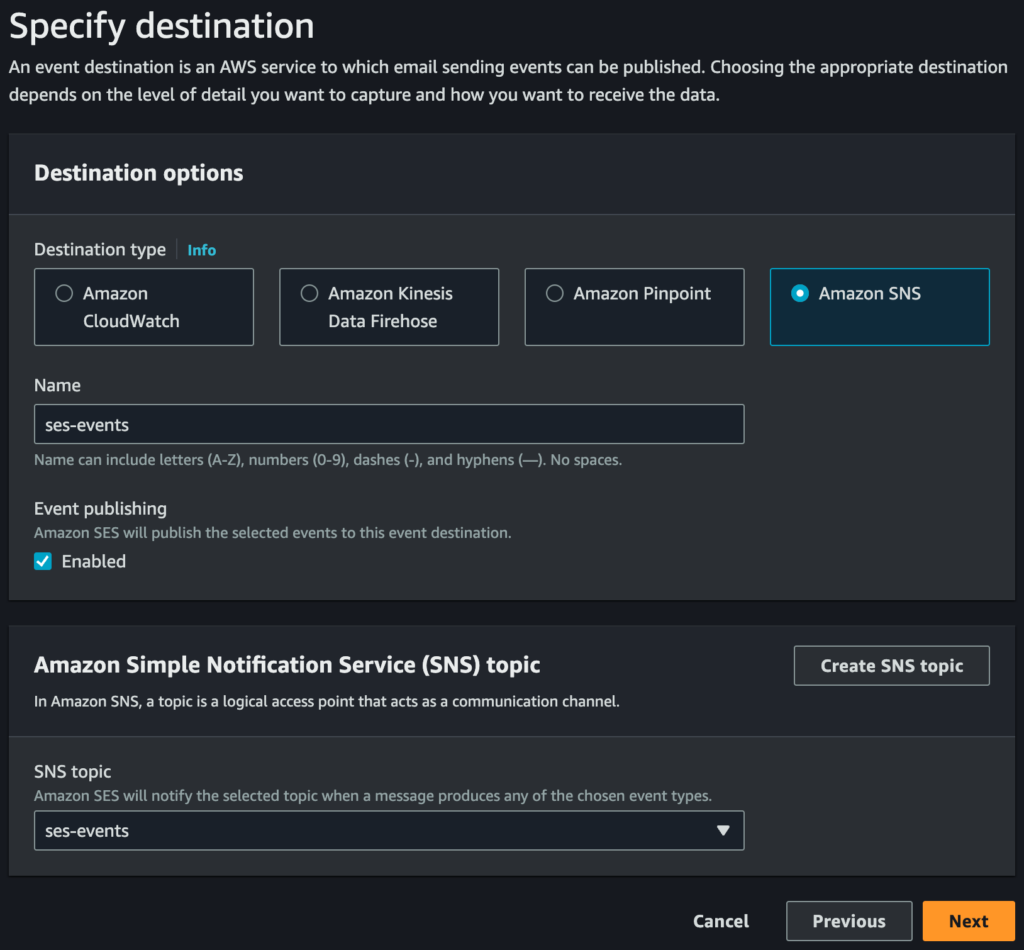
Select “Amazon SNS” as the destination, give it an appropriate name, then either create a new SNS topic or use a suitable existing topic, as per my example. Go to the next page and click the “Add destination” button to complete the process.
Next go to the SNS console, click “Topics” in the navigation bar on the left, then click on the the topic you previously created (let’s assume you called it “ses-events”), then click the “Create subscription” button, and you’ll see something like this:

For “Protocol” choose “Email”, then specify an email address that will be received as normal by your mail server. I’d suggest a custom alias to make it easier to catch in the procmail configuration, e.g. if your normal email is john@yourdomain.com, then choose something like ses-events@yourdomain.com. It’s important make sure that this address isn’t rejected in your MTA configuration, so you might want to test that before proceeding further. Then click the “Create subscription” button, and you should receive an email on the address you specified in which you need to click the link to confirm the subscription.
Configuring procmail on your mail server
Now, when you send an email, you should receive an SNS notification from SES in your inbox containing some rather difficult-to-read JSON with information about the email delivery. However, we want this to go into a log on your mail server in a nicely formatted manner, not into your inbox.
Once logged into your Linux VPS which runs your mail server, first create the SES log file. You can put this wherever you want, but I’ll assume the log file is going to be /var/log/ses-events, and I’ll assume your username is “john”, so change that accordingly. Create the log file and set permissions as follows:
sudo touch /var/log/ses-events
sudo chown john:john /var/log/ses-events
Then it should just be a case of configuring procmail, so edit the .procmailrc file in your home directory, and add the following block (replacing “ses-events@yourdomain.com” with the email address you set up in your SNS subscription):
# SES Events

:0 b:
* ^To:.*ses-events@yourdomain\.com
| sed '/^--$/,$d' | json_xs >> /var/log/ses-events
The b: tells incoming email to process the message body (not the headers), and to use a lockfile whilst running the command. The pipe symbol (“|“) tells procmail to pipe the output to the following shell command. The sed command removes the message signature (everything from “--” to the end of the text), then json_xs nicely reformats the JSON, then the final output is written to the log file /var/log/ses-events.
This should cause SES events to appear as nicely-formatted JSON in the log file, such as the following snippet showing details of a successful delivery:
{
   "delivery" : {
      "processingTimeMillis" : 1154,
      "recipients" : [
         "dave@recipientdomain.com"
      ],
      "reportingMTA" : "d219-17.smtp-out.eu-west-2.amazonses.com",
      "smtpResponse" : "250 2.0.0 Ok: queued as 7565547C37F8",
      "timestamp" : "2024-01-25T19:20:41.721Z"
   },
   "eventType" : "Delivery",
   "mail" : {
      "commonHeaders" : {
         "date" : "Thu, 25 Jan 2024 19:20:39 +0000",
         "from" : [
            "John Smith <john@yourdomain.com>"
         ],
         "messageId" : "010b019d42114576-869d171f-f7b2-44e4-a0be-72087af7b95b-000000",
         "subject" : "Setting up SES for better mail delivery",
         "to" : [
            "Dave Jones <dave@recipientdomain.com>"
         ]
      },
      "destination" : [
         "dave@recipientdomain.com"
      ],
      "headers" : [
Log rotation
You should add some log rotation so that /var/log/ses-events (or whatever log file you’re using) doesn’t grow huge and cause problems on your server. How you set this up will vary somewhat depending on what type of Linux you’re using. For Debian or Ubuntu you should just be able to create a logrotate configuration file e.g. /etc/logrotate.d/ses-events, then add the following (changing the parameters as you prefer, and changing the username from “john” to your own username):
/var/log/ses-events {
        weekly
        missingok
        rotate 12
        compress
        delaycompress
        notifempty
        create 640 john john
}
Conclusion
You should now see SES events appearing as nicely-formatted JSON in the log file you set up, so you can watch that alongside your other logs to check that emails are being delivered correctly.
If you need help with this or other email-related issues, or you need assistance with any other DevOps or SysAdmin problems or projects you’re working on, my freelance services are available if you’re potentially interested in hiring me.