Introduction
I recently migrated a client to a new AWS-based infrastructure, fully automated and managed via IaC (primarily Packer, Ansible and Terraform). However, a somewhat clunky old build/deploy system was still being used, so it was also time to migrate that to a new automated CI/CD (continuous integration/continuous delivery) system for builds and deployments. Keeping costs as low as possible was a priority, so I ruled out Jenkins since that would have cost money to maintain an additional instance for extended periods of time.
Since GitHub was already in use, GitHub Actions was an obvious choice because the virtual instances (known as “runners”) used for code builds only exist for as long as necessary to run all the build commands. Costs are therefore kept as low as possible. Since the infrastructure was already running on Amazon Web Services, AWS CodeDeploy made sense as an integrated solution for deploying code. The challenge therefore was to get the builds working on GitHub Actions, then to connect GitHub Actions to AWS CodeDeploy for full CI/CD deployments.
This simple diagram shows the desired CI/CD architecture with GitHub Actions and AWS CodeDeploy:
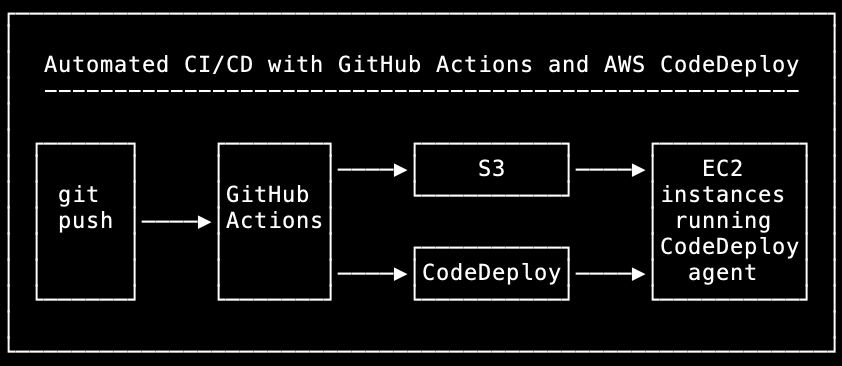
The goal was to end up with the following CI/CD workflow:
- A git push triggers a GitHub Actions build.
- The distribution files from the build are copied to an AWS S3 bucket.
- The build triggers the CodeDeploy deployment, which performs the following actions on each EC2 instance in the auto-scaling group one at a time:
- The instance is taken out of service on the load balancer.
- The application is stopped on the instance.
- The deployment pulls the git commit to the instance.
- The distribution files are copied from the S3 bucket to the web directory on the instance.
- The application is started on the instance.
- The web server is restarted on the instance.
- The instance is put back into service on the load balancer.
- Once all instances have been deployed to, the deployment is marked as successful.
Let’s now get into the details of how to achieve this.
Permissions
AWS service role for CodeDeploy
CodeDeploy needed permissions on EC2 to perform the deployments, and it also needed S3 permissions so it could copy the distribution files from S3 in order to deploy them.
Most of this could be achieved by creating an IAM role and adding the AWS managed policy “AWSCodeDeployRole”. I also needed to add an inline policy to the role, to handle the use of EC2 launch templates, as follows:
{
	"Version": "2012-10-17",
	"Statement": [
		{
			"Sid": "LaunchTemplatePermissions",
			"Effect": "Allow",
			"Action": [
				"ec2:RunInstances",
				"ec2:CreateTags",
				"iam:PassRole"
			],
			"Resource": "*"
		}
	]
}
Additionally, I needed to add an inline policy to the role for the S3 access needed:
{
	"Version": "2012-10-17",
	"Statement": [
		{
			"Sid": "S3BucketAccess",
			"Effect": "Allow",
			"Action": "s3:GetObject",
			"Resource": "arn:aws:s3:::codedeploy-bucket/*"
		}
	]
}
AWS user for GitHub Actions access
I set up an AWS user in IAM which could be used by GitHub Actions for access to an S3 bucket for copying distribution files, and for access to CodeDeploy for triggering deployments.
To this user I therefore added the AWS managed policy “AWSCodeDeployDeployerAccess” which provides the necessary access to CodeDeploy, and I also added an inline policy to provide the necessary S3 access, as follows:
{
	"Version": "2012-10-17",
	"Statement": [
		{
			"Sid": "S3AccessForGitHubActions",
			"Effect": "Allow",
			"Action": [
				"s3:ListBucket",
				"s3:GetObject",
				"s3:PutObject",
				"s3:DeleteObject"
			],
			"Resource": [
				"arn:aws:s3:::codedeploy-bucket",
				"arn:aws:s3:::codedeploy-bucket/*"
			]
		}
	]
}
I then created access keys for the user.
GitHub repository secrets
Under Settings in the GitHub repository there’s a section for “Secrets and variables”, and under “Actions” I added three repository secrets: AWS_ACCESS_KEY_ID and AWS_SECRET_ACCESS_KEY containing the key details from the IAM user account, and AWS_REGION containing the region. These can then be used from the GitHub Actions workflow as shown below.
GitHub Actions
Setting up GitHub Actions is fairly straightforward, since it’s essentially just a case of adding one or more workflow files in each repository. (A GitHub Actions workflow corresponds to a “pipeline” in some other CI/CD systems, e.g. Jenkins.) Here I’ll keep it simple and use one repository as an example. Within the repository, checkout the relevant branch (I’m using the “test” branch in this case) then create the directory .github/workflows if it doesn’t already exist, and put workflow files in there.
Here’s a workflow to build and deploy the test branch to the test environment:
name: Build and deploy test

on:
  push:
    branches:
      - test

env:
  reponame: our_code_repository
  codedeployname: nodejs-app
  environment: test
  s3bucket: codedeploy-bucket

jobs:
  build:
    name: Build and deploy
    runs-on: ubuntu-latest
    steps:

      - name: Checkout repository
        uses: actions/checkout@v4

      - name: Set AWS credentials
        uses: aws-actions/configure-aws-credentials@v4
        with:
          aws-access-key-id: ${{ secrets.AWS_ACCESS_KEY_ID }}
          aws-secret-access-key: ${{ secrets.AWS_SECRET_ACCESS_KEY }}
          aws-region: ${{ secrets.AWS_REGION }}

      - name: Node.js build
        uses: actions/setup-node@v3
        with:
          node-version: '20.x'
      - run: npm install
      - run: npm run build

      - name: Upload to S3
        working-directory: dist
        run: aws s3 sync ./ s3://${{ env.s3bucket }}/${{ env.codedeployname }}/${{ env.environment }}/ --delete

      - name: Run CodeDeploy deployment
        run: |
          aws deploy create-deployment --application-name ${{ env.codedeployname }}-${{ env.environment }} --deployment-group-name ${{ env.codedeployname }}-${{ env.environment }} --deployment-config-name CodeDeployDefault.OneAtATime --github-location repository=${{ github.repository }},commitId=${{ github.sha }}
In the on: section it specifies that this will be triggered when there is a push to the test branch.
The env: section defines variables including the repository name, the CodeDeploy application to run, the environment and the S3 bucket to use for copying files.
The jobs: section defines the job to build and deploy. It spins up an Ubuntu VM as a “runner” on which to run the job, then checks out the repository, then sets the AWS credentials as set up previously. It then sets up a Node.js environment and builds the distribution files.
Next, it uploads the newly built files from the dist directory to the S3 bucket. It’s using subdirectories on the bucket so sets of files are differentiated on the basis of which application this is for, and which environment it’s being deployed to.
Finally it triggers a deployment on CodeDeploy, with the CodeDeploy application specified as ${{ env.codedeployname }}-${{ env.environment }} which would expand to “nodejs-app-test” in this case, with some additional parameters for CodeDeploy.
AWS CodeDeploy
Installing the CodeDeploy agent
Before CodeDeploy can be used for EC2 instances, the CodeDeploy agent needs to be installed and running on all instances. This is fairly straightforward and can be done by following the AWS documentation for installing the CodeDeploy agent.
I use Ansible for automated deployments, and it’s a little unfortunate that the CodeDeploy agent cannot be installed via simple yum, dnf or apt commands. I put together this Ansible task playbook for installing and upgrading the CodeDeploy agent on Amazon Linux instances, which seems to work reasonably well:
---

- name: check if codedeploy-agent executable exists
  stat:
    path: /opt/codedeploy-agent/bin/codedeploy-agent
  register: agent_executable

- name: download codedeploy-agent installer
  get_url:
    url: https://aws-codedeploy-eu-west-2.s3.eu-west-2.amazonaws.com/latest/install
    dest: /tmp/install
    mode: '0755'
  when: not agent_executable.stat.exists

- name: install codedeploy-agent
  command: ./install auto
  args:
    chdir: /tmp
  notify: restart codedeploy-agent
  when: not agent_executable.stat.exists

# For updating/patching
- name: update codedeploy-agent
  command: /opt/codedeploy-agent/bin/install auto
  notify: restart codedeploy-agent
  when: software_update is defined and agent_executable.stat.exists
This will install the agent when it’s not already installed, except if the variable “software_update” has been defined when running the playbook and the agent is already installed, in which case it should upgrade it.
This notifies an Ansible handler “restart codedeploy-agent” when a restart is needed, and that handler is defined in another playbook as follows:
---

- name: restart codedeploy-agent
  service:
    name: codedeploy-agent
    enabled: yes
    state: restarted
Setting up CodeDeploy specifications for managing the deployment
The steps run by CodeDeploy during a deployment are defined in the appspec.yml file in the root of the repository, and in the relevant branch. In this case, in the test branch, appspec.yml looks something like this (although actually I’ve kept it as generic as possible, so this same file works unchanged in other branches):
version: 0.0
os: linux
files:
  - source: /
    destination: /home/ec2-user/nodejs-app
file_exists_behavior: OVERWRITE
hooks:
  ApplicationStop:
    - location: codedeploy-scripts/application-stop.sh
      timeout: 300
      runas: ec2-user
  AfterInstall:
    - location: codedeploy-scripts/after-install.sh
      timeout: 300
      runas: ec2-user
  ApplicationStart:
    - location: codedeploy-scripts/application-start.sh
      timeout: 300
      runas: ec2-user
This tells CodeDeploy to copy the repository to /home/ec2-user/nodejs-app on the EC2 instances, then to run the appropriate hook scripts as user “ec2-user” on the instances for the relevant deployment phases, known as “lifecycle events”. More details on these lifecycle events and corresponding hook scripts below.
ApplicationStop
The ApplicationStop lifecycle event triggers the hook script codedeploy-scripts/application-stop.sh in the repository to run commands necessary for stopping the Node.js via PM2 application prior to installation. This shell script looks something like this and should be fairly self-explanatory:
#!/bin/bash

# Set variables
reponame=nodejs-app
pm2_proc=$reponame

# Stop application
pm2 stop $pm2_proc
pm2 delete $pm2_proc
AfterInstall
The AfterInstall lifecycle event triggers the hook script codedeploy-scripts/after-install.sh in the repository to run commands necessary before starting the application. This shell script looks something like this:
#!/bin/bash

# Set variables
reponame=nodejs-app
repodir=/home/ec2-user/${reponame}
webdir=/srv/www/nodejs-app
codedeployname=nodejs-app
environment=$(cat /etc/nodejs_environment.dat)
s3bucket=codedeploy-bucket

# Set permissions
sudo chown -R ec2-user:ec2-user $repodir
sudo chmod 755 $repodir/codedeploy-scripts/*.sh

# Copy files into place
[ -d $webdir ] && rm -frv ${webdir}/*
aws s3 sync s3://${s3bucket}/${codedeployname}/${environment}/ ${webdir}/ --delete
With regard to the “environment” variable set in this script: EC2 instances are built specifically for different environments, and during the build process a file is created on the instance called /etc/nodejs_environment.dat which simply contains the environment the instance is running in (e.g. “test”). This data can then be used by scripts such as this one. This makes it possible to avoid hard-coding things, so these CodeDeploy hook scripts can be used on multiple branches and environments automatically, without having to be modified.
This AfterInstall lifecycle event hook script firstly ensures the right permissions are set on the local repository on the instance once it’s been pulled, and sets executable permissions on the CodeDeploy scripts. Next it clears out the old distribution files from the web directory, then it copies the newly built distribution files from the correct subdirectory on the S3 bucket into the web directory.
ApplicationStart
The ApplicationStart lifecycle event triggers the hook script codedeploy-scripts/after-install.sh in the repository to run commands necessary before starting the application. This shell script looks something like this:
#!/bin/bash

# Set variables
reponame=nodejs-app
repodir=/home/ec2-user/${reponame}
environment=$(cat /etc/environment.dat)

# Start application
cd $repodir
pm2 start app.js --env $environment

# Restart web server
sudo systemctl restart nginx
This will start the Node.js application using PM2, with the appropriate settings for the environment. Then it restarts nginx to ensure the web server picks up all the new files from the build and reconnects via proxy to the Node.js process running via PM2.
Provisioning a CodeDeploy application and deployment group
I used Terraform to provision the CodeDeploy application and deployment group, along the following lines:
resource "aws_codedeploy_app" "nodejs-app" {
  compute_platform = "Server"
  name             = "nodejs-app-${terraform.workspace}"
}

resource "aws_codedeploy_deployment_group" "nodejs-app" {

  app_name                    = aws_codedeploy_app.nodejs-app.name
  deployment_group_name       = "nodejs-app-${terraform.workspace}"
  service_role_arn            = "arn:aws:iam::012345678901:role/ServiceRoleForCodeDeploy"
  autoscaling_groups          = [ aws_autoscaling_group.nodejs-app.name ]
  deployment_config_name      = "CodeDeployDefault.OneAtATime"

  deployment_style {
    deployment_option = "WITH_TRAFFIC_CONTROL"
    deployment_type   = "IN_PLACE"
  }

  load_balancer_info {
    target_group_info {
      name = aws_lb_target_group.nodejs-app.name
    }
  }

}
Firstly this creates the CodeDeploy application “nodejs-app”. I have Terraform workspace names set to the same names as the environments being used, so in this case I’m working in the Terraform “test” workspace, so the name “nodejs-app-${terraform.workspace}” expands to “nodejs-app-test”.
Then it creates the CodeDeploy deployment group corresponding to the CodeDeploy application, with the same name as the application. This requires the ARN for the IAM service role for CodeDeploy we created earlier. In this case I’m linking it to existing EC2 auto-scaling groups and corresponding load balancers so that CodeDeploy is able to fully integrate with those services when performing deployments.
Once the CodeDeploy application and deployment group are set up, there was one additional thing I found I needed to do manually. CodeDeploy needs authentication for access to GitHub to pull the repository. This is just a case of creating a manual deployment within CodeDeploy using the new application, which can be done in the CodeDeploy web console by going to Applications, then selecting the new application, then going to the Deployments tab, then clicking “Create deployment”. Select the deployment group at the top, then select “My application is stored in GitHub”, then it’s possible to specify GitHub account credentials. After that, enter the repository name and specify the commit ID of a suitable commit, then the deployment can be created and run. Once that’s done, it should not be necessary to run any more manual deployments, as it should all run automatically from here on.
Bringing the CI/CD workflow together: running fully automated builds and deployments
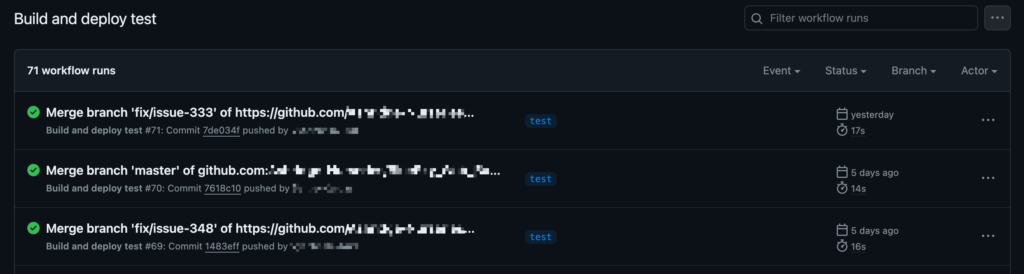
Now, when pushing to the test branch in the “nodejs-app” repository, GitHub Actions notices the presence of the workflow file and runs the build. The output can be seen in the “Actions” tab of the repository in the GitHub web console, where a list of workflow runs can be seen:
From here it’s possible to click on a workflow run and see more details of the output, where individual elements can be expanded to see more detail:
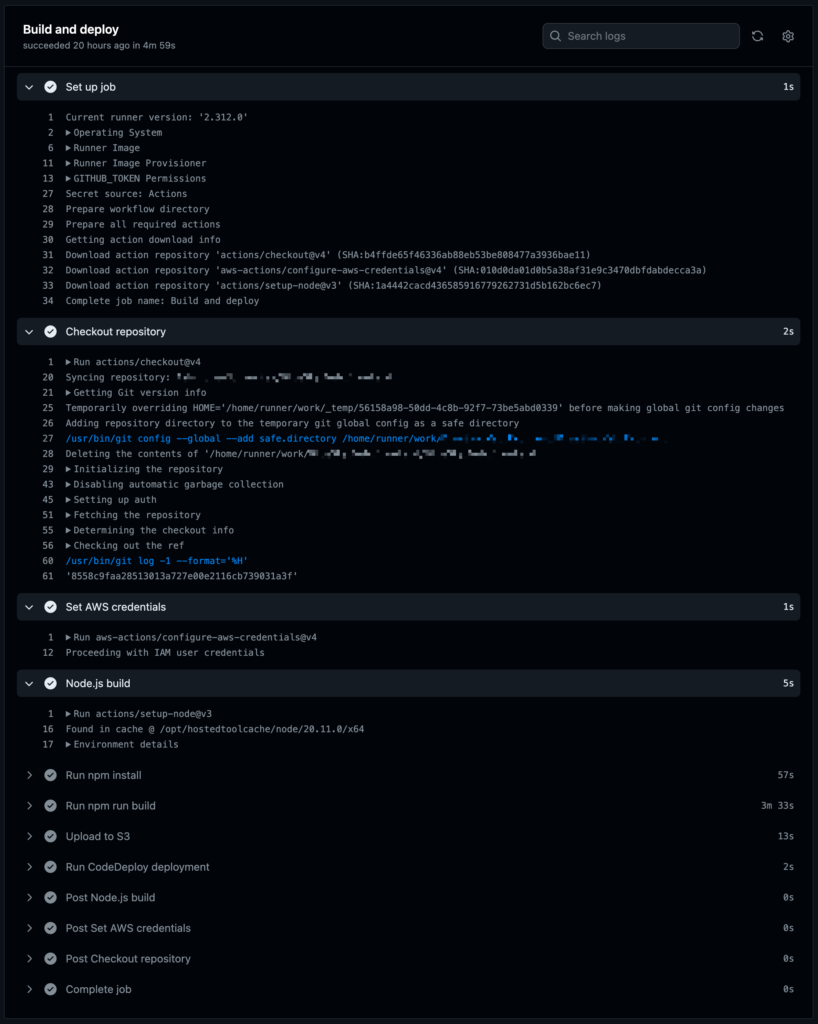
If all went well, the build will have completed, then it will show the files having been copied to S3, then the CodeDeploy deployment will have been initiated.
At this point the deployment should appear in the “Deployments” page on the CodeDeploy web console, where a history of deployments can be seen:

It’s possible to click on a deployment to see details of the deployment status:
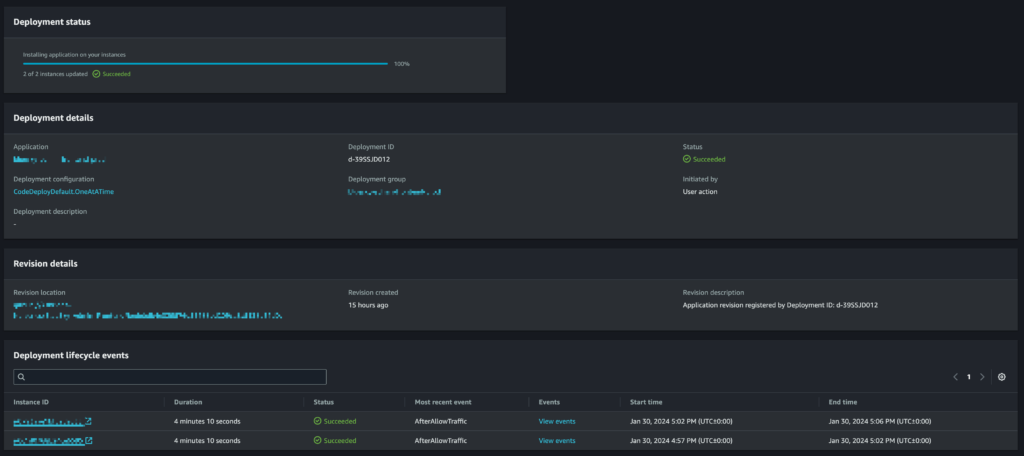
From here, details of the lifecycle events on each EC2 instance can be seen by clicking on “View events” for an instance:

If the deployment failed on one of the lifecycle events, it’s possible to click on the failure to get more details and output regarding what went wrong.
With this setup configured to integrate with auto-scaling and load balancer, CodeDeploy knows to deploy to the entire EC2 auto-scaling group. Whilst deploying, it will also automatically remove an instance from a load balancer target group, then will add it back to the target group when complete and wait for it to become healthy before moving on to the next instance (or marking the deployment as successful if there are no more instances).
As part of the setup process, CodeDeploy automatically installs an auto-scaling lifecycle event hook into the auto-scaling group. This means that when the auto-scaling group scales out, CodeDeploy automatically runs the latest successful deployment on the new EC2 instances which have been launched, thus ensuring the whole group is up to date with the latest successful deployment at all times. These will show in CodeDeploy with the initiating event as “Auto Scaling group action”, as opposed to “User action” when the deployment has been triggered from GitHub Actions.
Multiple repositories, branches and environments
Once this setup is working, it can be expanded and modified to run on additional repositories as needed. Also, by modifying the workflow and specification scripts and definitions, this can be expanded to multiple branches and environments with the same repository. In this example the test branch acts on the “test” environment, but a similar configuration could be set up for the master branch in the repository which would run a separate build and deployment for the production environment.
Conclusion
By combining GitHub Actions and AWS CodeDeploy, it’s possible to create a powerful, effective and fully automated build and deployment system for CI/CD which doesn’t require the additional cost overhead of running a dedicated build server such as Jenkins, and which handles the additional complexity of auto-scaling groups, load balancers, etc. automatically.
If you need help with setting up a new CI/CD build and deployment system from scratch, or with migrating to a better system from what you already have, or with ironing out problems with a new system, my freelance services are available. I also cover many other areas of DevOps, infrastructure and SysAdmin, so drop me a line any time if you need assistance.